

Top 5 Tools for Polymer Clay Beginners
Sam SmithI've had this question recently and thought it would be helpful for those starting out on their polymer clay journey! If you're just starting out with polymer clay, you might be wondering: "What tools do I really need?". After plenty of trial and error (and so many frustrating mistakes), I’ve learned which tools are worth investing in.
If I had to restart my polymer clay journey from scratch, here are the top 5 things I would buy again to make life so much easier.
1. High Quality Clay
While it's not technically a "tool" the clay you work with is super important!
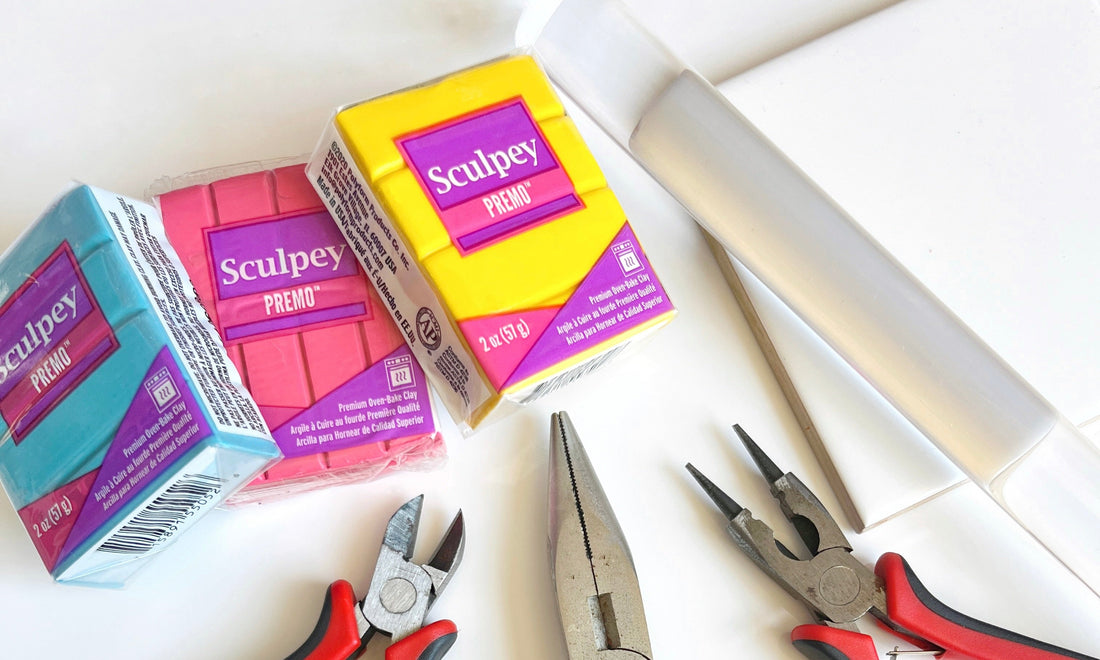
I personally use Sculpey Premo for 95% of my work. I highly recommend this brand to anyone starting out! Yes, it can be a bit pricey, but using a high quality clay is worth it. Sculpey Premo is easy to work with, has a great colour range, looks great and is strong when baked, and is widely available where I live in New Zealand.
For the remaining 5%, I use Sculpey Soufflé. It is not my favourite clay as I find the fuzzy texture of the clay not suitable for a majority of my work, but I love to mix it with premo as it has some really nice colours!
Avoid starting with a 'cheaper' brand of polymer clay. You may think you are getting a good deal, but in the long run it will cause more frustration down the line. There is nothing worse than spending hours on a project working with terrible oily/dry clay, only to have it break, crack or bubble after baking.
For jewellery makers, I would not recommend using Sculpey III. From experience this clay is very weak and crumbly when baked, and I find it is roughly the same price as Premo for much less quality. Spend your money wisely!

2. Acrylic Rolling Pin or Pasta Machine
Now you will need something to help condition your clay! Fresh out of the packet, your clay will most likely be a little hard as it needs to be conditioned to make it easier to work with. Here is how I do it:
- Hold the clay and warm it up in your hands for a minute.
- Using an acrylic rolling pin, roll the clay until it is flat.
- Then, if you have one, put the clay in a pasta machine to condition it further and mix new colours evenly.
If you can afford it, a pasta machine will help a ton with conditioning your clay! I have been using a Marcato Atlas 150 Pasta Machine for years. It’s durable and has adjustable thickness settings, which are perfect for creating even surfaces for flat clay jewellery.
We started out using a cheap pasta machine which worked well for a while, but it ended up breaking after a few months. Please only use a dedicated pasta machine for this, do not use it for food once it has been used with clay!
Using an acrylic roller will condition the clay, but it will take more arm muscle and time to fully condition. It's also just a great tool to have in in your clay toolkit.

3. Ceramic Tiles
Ceramic tiles are relatively cheap and easy to find at your local hardware store! Here is why I love them:
- They make a great work surface! You can cut, slice, and scrape directly on the tile without worrying about damaging your nice table! They are also easy to move to the side if you need a break and need to use your desk for another project.
- White tiles make a great backdrop for photos or reels, and the white helps your eyes when mixing clay colours.
- You can pop the tile into the oven with your clay by directly baking it on the tile!
Tiles are also SUPER handy for keeping the heat in your oven while baking your project. My bench top oven has extra titles placed inside the top and bottom rack to stop the elements scorching the clay.
I like to think of it as "insulation" so the heat stays in the oven! If your oven is 'spiking' or not keeping a consistent temperature, give this a try. The more tiles you can keep in your oven, the better your oven will stay the correct temperature.

4. Oven Thermometer
This was one of the hardest lessons I learned. Your oven temperature matters SO much when baking polymer clay. I started out using the big oven in my kitchen to bake my polymer clay projects and I would wonder why my clay was burnt or underbaked. "But the dial was at the correct temperature? What went wrong?"
I learnt that most ovens are very inaccurate in temperature especially as they get older. Setting the dial to 130 °C does not mean your oven will be 130 °C. An oven thermometer allows you to monitor the actual temperature inside. Often my oven would spike in heat and cause all of that hard work to burn! If I had measured it, the oven temperature probably would have reached 200 °C without me even knowing! This would for sure burn the clay inside the oven and ruin hours of hard work.
My current setup:
- I use a dedicated second-hand bench top oven to bake my clay pieces in. It lives in my studio so I can keep a closer eye on it.
- There are two basic thermometers in the oven just incase one is inaccurate.
- A digital thermometer to warn me with a loud "beep" if the temperature spikes.
Don't worry about buying a fancy thermometer. Using one affordable thermometer will work just fine!

5. Pliers
This applies mainly for those wanting to work with jewellery making, but having good pliers helps when assembling your jewellery. I still use the pliers I started out with years ago! Mine may need to be replaced soon, but they still get the job done.
You will need:
- A needle nose plier to be able to bend the metal findings and position them. Mine has a ribbed texture which gives it a good grip.
- A round nose plier. It should have a non-textured, smooth, surface. They are ideal for making loops from a straight wire.
- A cutting plier. I use mine to trim the metal eye pins for clay charms.

__________________________________________
By using the right tools and high-quality materials, you can save yourself from a lot of trial and error. Starting with these essentials will make your polymer clay journey much more enjoyable!
What are your favourite polymer clay tools? Share your tips in the comments below. I’d love to hear them!
